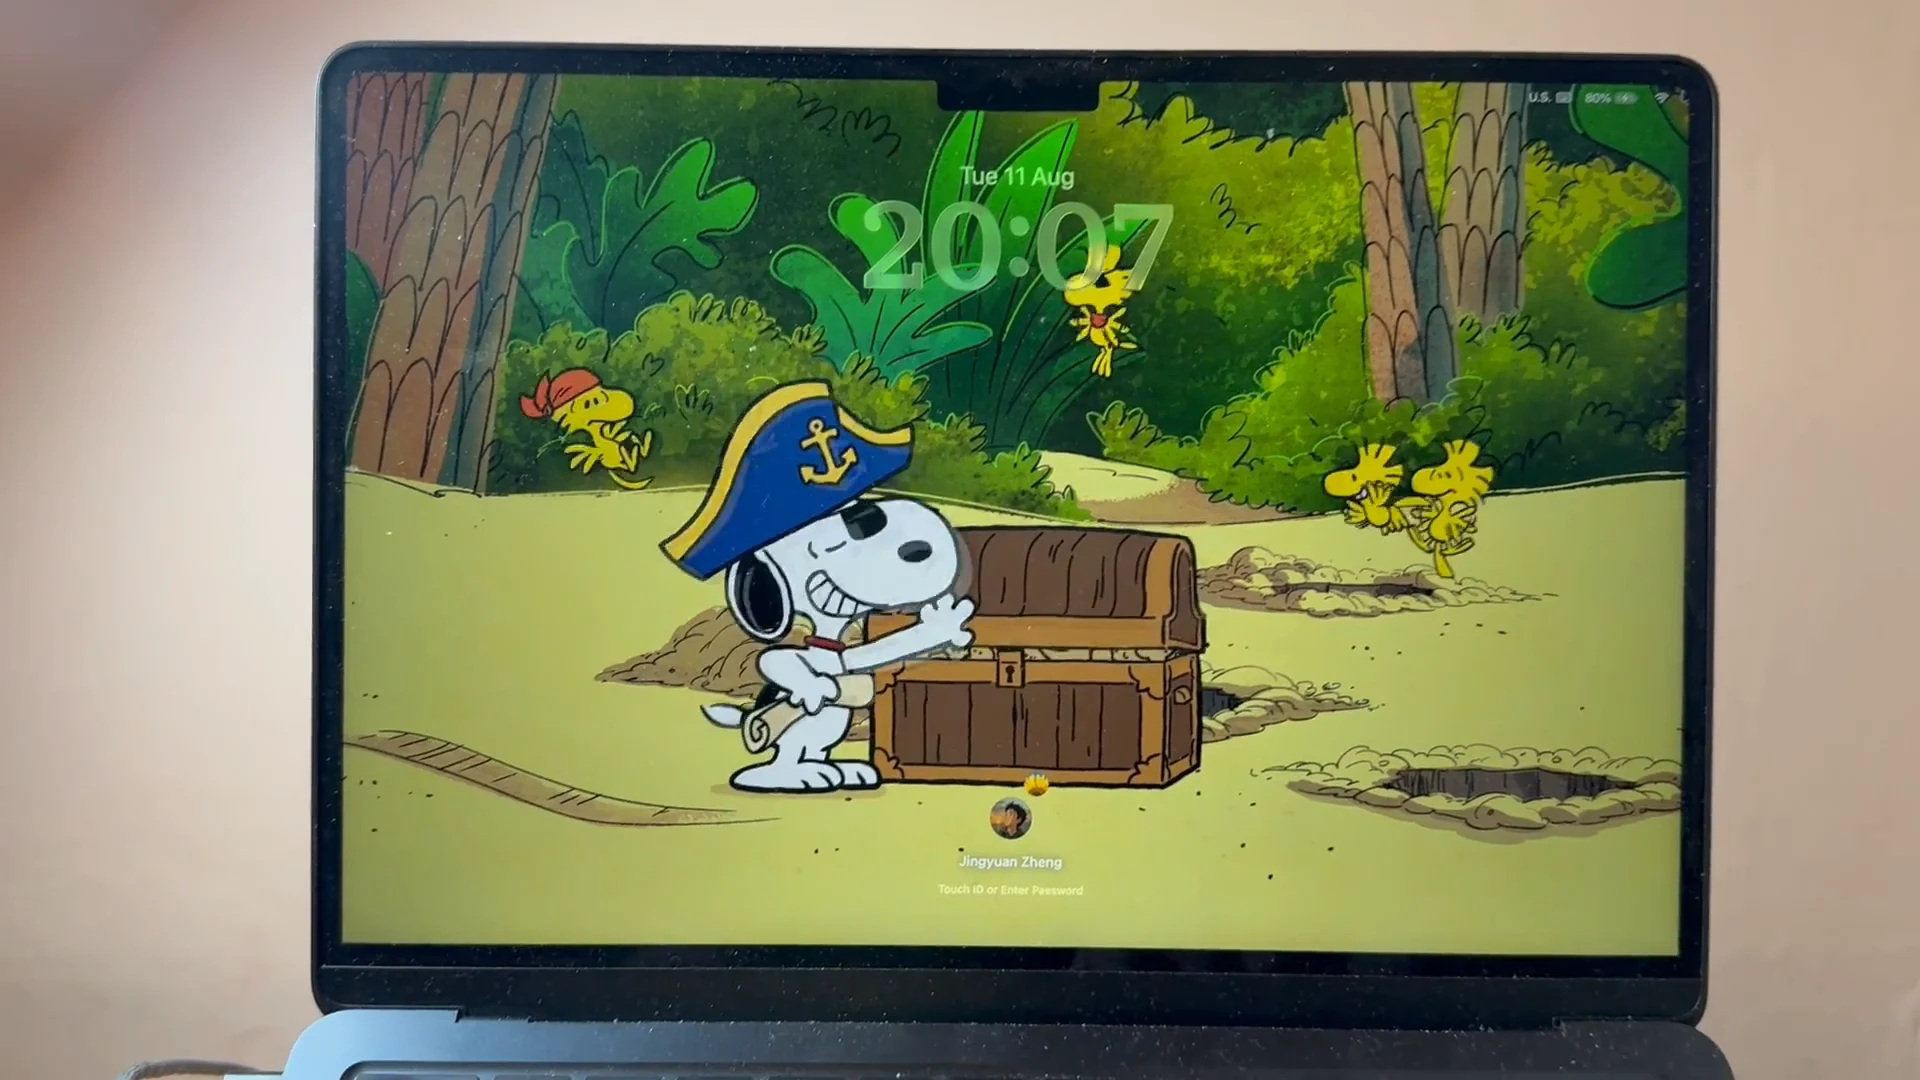
This guide explains how to add any video to macOS as a system-integrated wallpaper, with Lock Screen playback, a still desktop, and a smooth animated-to-static transition when you unlock your Mac. It also shows how to extract the original high-resolution Snoopy screen saver videos from Apple TV resources.
See the result first
The limits of typical macOS video wallpaper apps—and the missing Snoopy wallpaper
Setting a video wallpaper on a Mac usually means installing a dedicated animated-wallpaper app such as Wallpaper Engine. Some of these apps are paid, and many work by keeping a player running continuously behind the desktop. They may not play on the real macOS Lock Screen, cannot reproduce the slow animated-to-still unlock transition, and do not place your videos in the built-in System Settings → Wallpaper picker.
Many people also love the Snoopy screen savers included with Apple TV. Unfortunately, Apple has not made them available as native Mac wallpapers. Community ports such as Snoopy and Snoopy-Saver bring the animations to macOS as traditional screen saver modules, but they do not turn them into desktop wallpapers. Some older approaches have also suffered from high memory use, incomplete scene collections, or unreliable playback.
The method in this guide makes a custom video appear alongside Apple’s own wallpapers in System Settings and lets macOS manage playback through its wallpaper pipeline. The management app does not need to remain open. The second half of the guide explains how to obtain the complete high-resolution Snoopy videos without installing Xcode. If you already have a video you want to use, skip directly to Install the video wallpaper.
What Phosphene does differently
This method uses Phosphene, an open-source macOS app that connects custom videos to the same system wallpaper infrastructure used by Apple’s Aerials. Imported videos appear in the Wallpaper pane, can play on the real Lock Screen, and can ease from motion to a still frame as the Mac unlocks. You can also keep them playing continuously on the desktop if that is the effect you prefer.
Phosphene uses macOS’s wallpaper pipeline instead of placing a permanent player window behind your apps. After choosing a wallpaper, you can quit Phosphene completely with ⌘ Command + Q. Its wallpaper extension continues to provide frames to the system WallpaperAgent, which coordinates desktop, Lock Screen, idle, sleep, and display-state changes.
Main Phosphene features
- Bring your own video: Import MP4, MOV, or another format readable by AVFoundation. The video appears in System Settings → Wallpaper.
- Gapless looping: The renderer keeps timestamps continuous across loop boundaries to avoid the usual pause or flash.
- Multiple displays and Spaces: macOS can preserve different selections for individual displays and desktop Spaces.
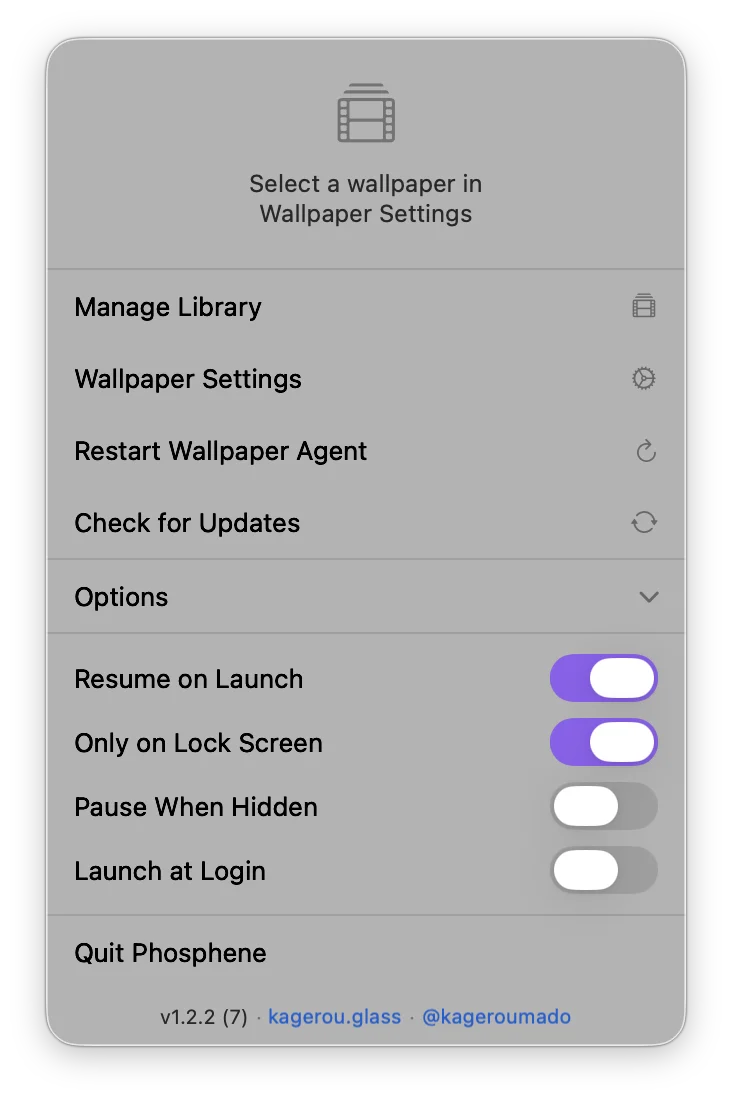
- Power-aware playback: Playback policy responds to power source, battery level, thermal state, Game Mode, and whether the Mac is active, idle, or locked.
- Lock Screen-only mode:
Only on Lock Screenkeeps the desktop still, starts motion when the Mac locks, and eases back to a still frame when it unlocks. - Pause while covered:
Pause When Hiddencan stop unnecessary rendering when windows completely cover every display. - Adaptive variants: Phosphene can prepare lower-resolution or lower-frame-rate versions and select a lighter version when the current power policy calls for it.
- Menu bar controls: Preview or pause the current wallpaper, switch displays, open Wallpaper settings, or restart the wallpaper agent.
Phosphene relies on an Apple private framework, so a major macOS update may require a corresponding app update. At the time of writing, Phosphene 1.2.2 requires macOS Tahoe 26 or later and ships as a universal build for both Apple silicon and Intel Macs.
Setup
Install Phosphene
If you use Homebrew, install the app with:
|
|
Alternatively, download the signed and notarized DMG from the Phosphene 1.2.2 release, drag Phosphene to Applications, and open it.
Get the original Apple TV Snoopy screen saver videos
It is possible to download an Apple TV simulator through Xcode and retrieve the resources from that environment, but doing so is unnecessarily cumbersome for this purpose.
The open-source Snoopy-Saver project has already collected the complete media resources and packaged them as a Mac screen saver. Snoopy-Saver itself is a traditional .saver module rather than an Aerial-style wallpaper, so it cannot play on both the desktop and Lock Screen with the system transition used in this guide. We will not install it. We only need to extract the original video files from its disk image.
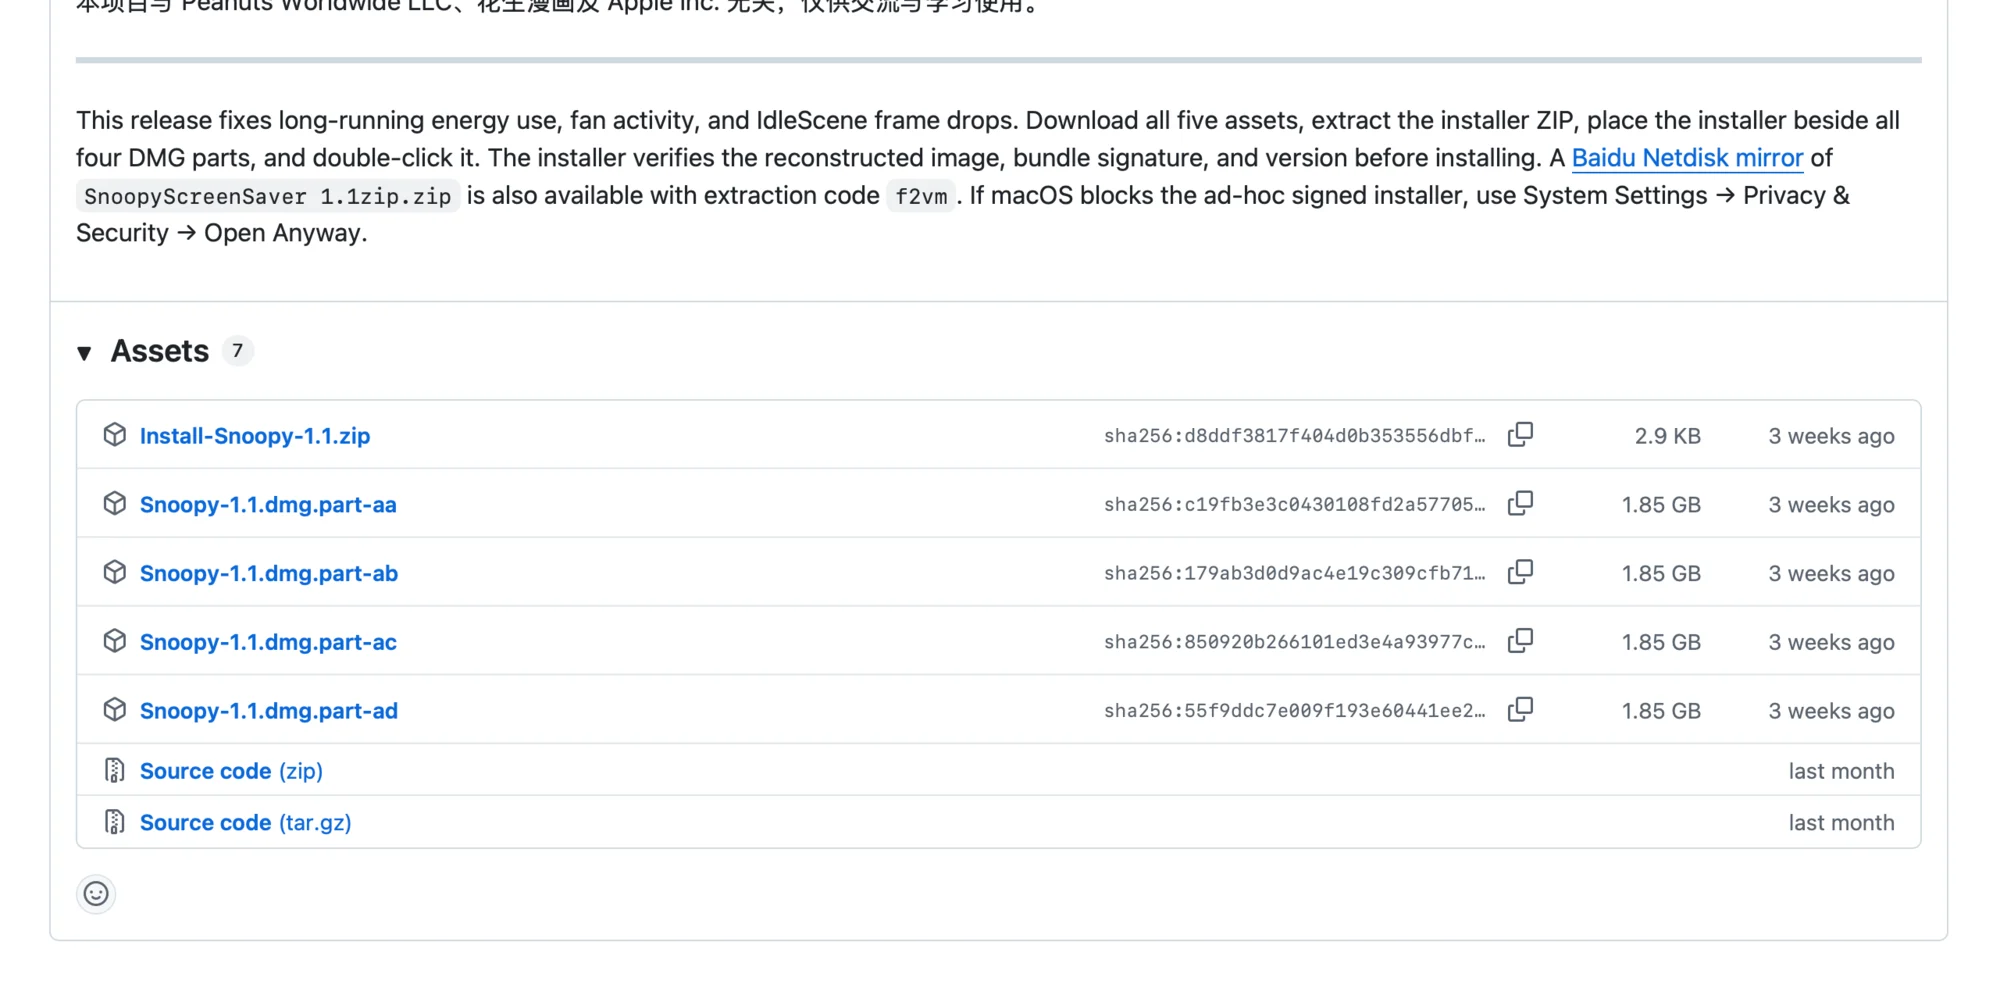
Open the Snoopy 1.1 release page and download these five assets:
Install-Snoopy-1.1.zipSnoopy-1.1.dmg.part-aaSnoopy-1.1.dmg.part-abSnoopy-1.1.dmg.part-acSnoopy-1.1.dmg.part-ad
Each of the four DMG parts is about 1.85 GB, so check your available storage and network allowance first. You do not need the automatically generated Source code archives (see Figure 1).
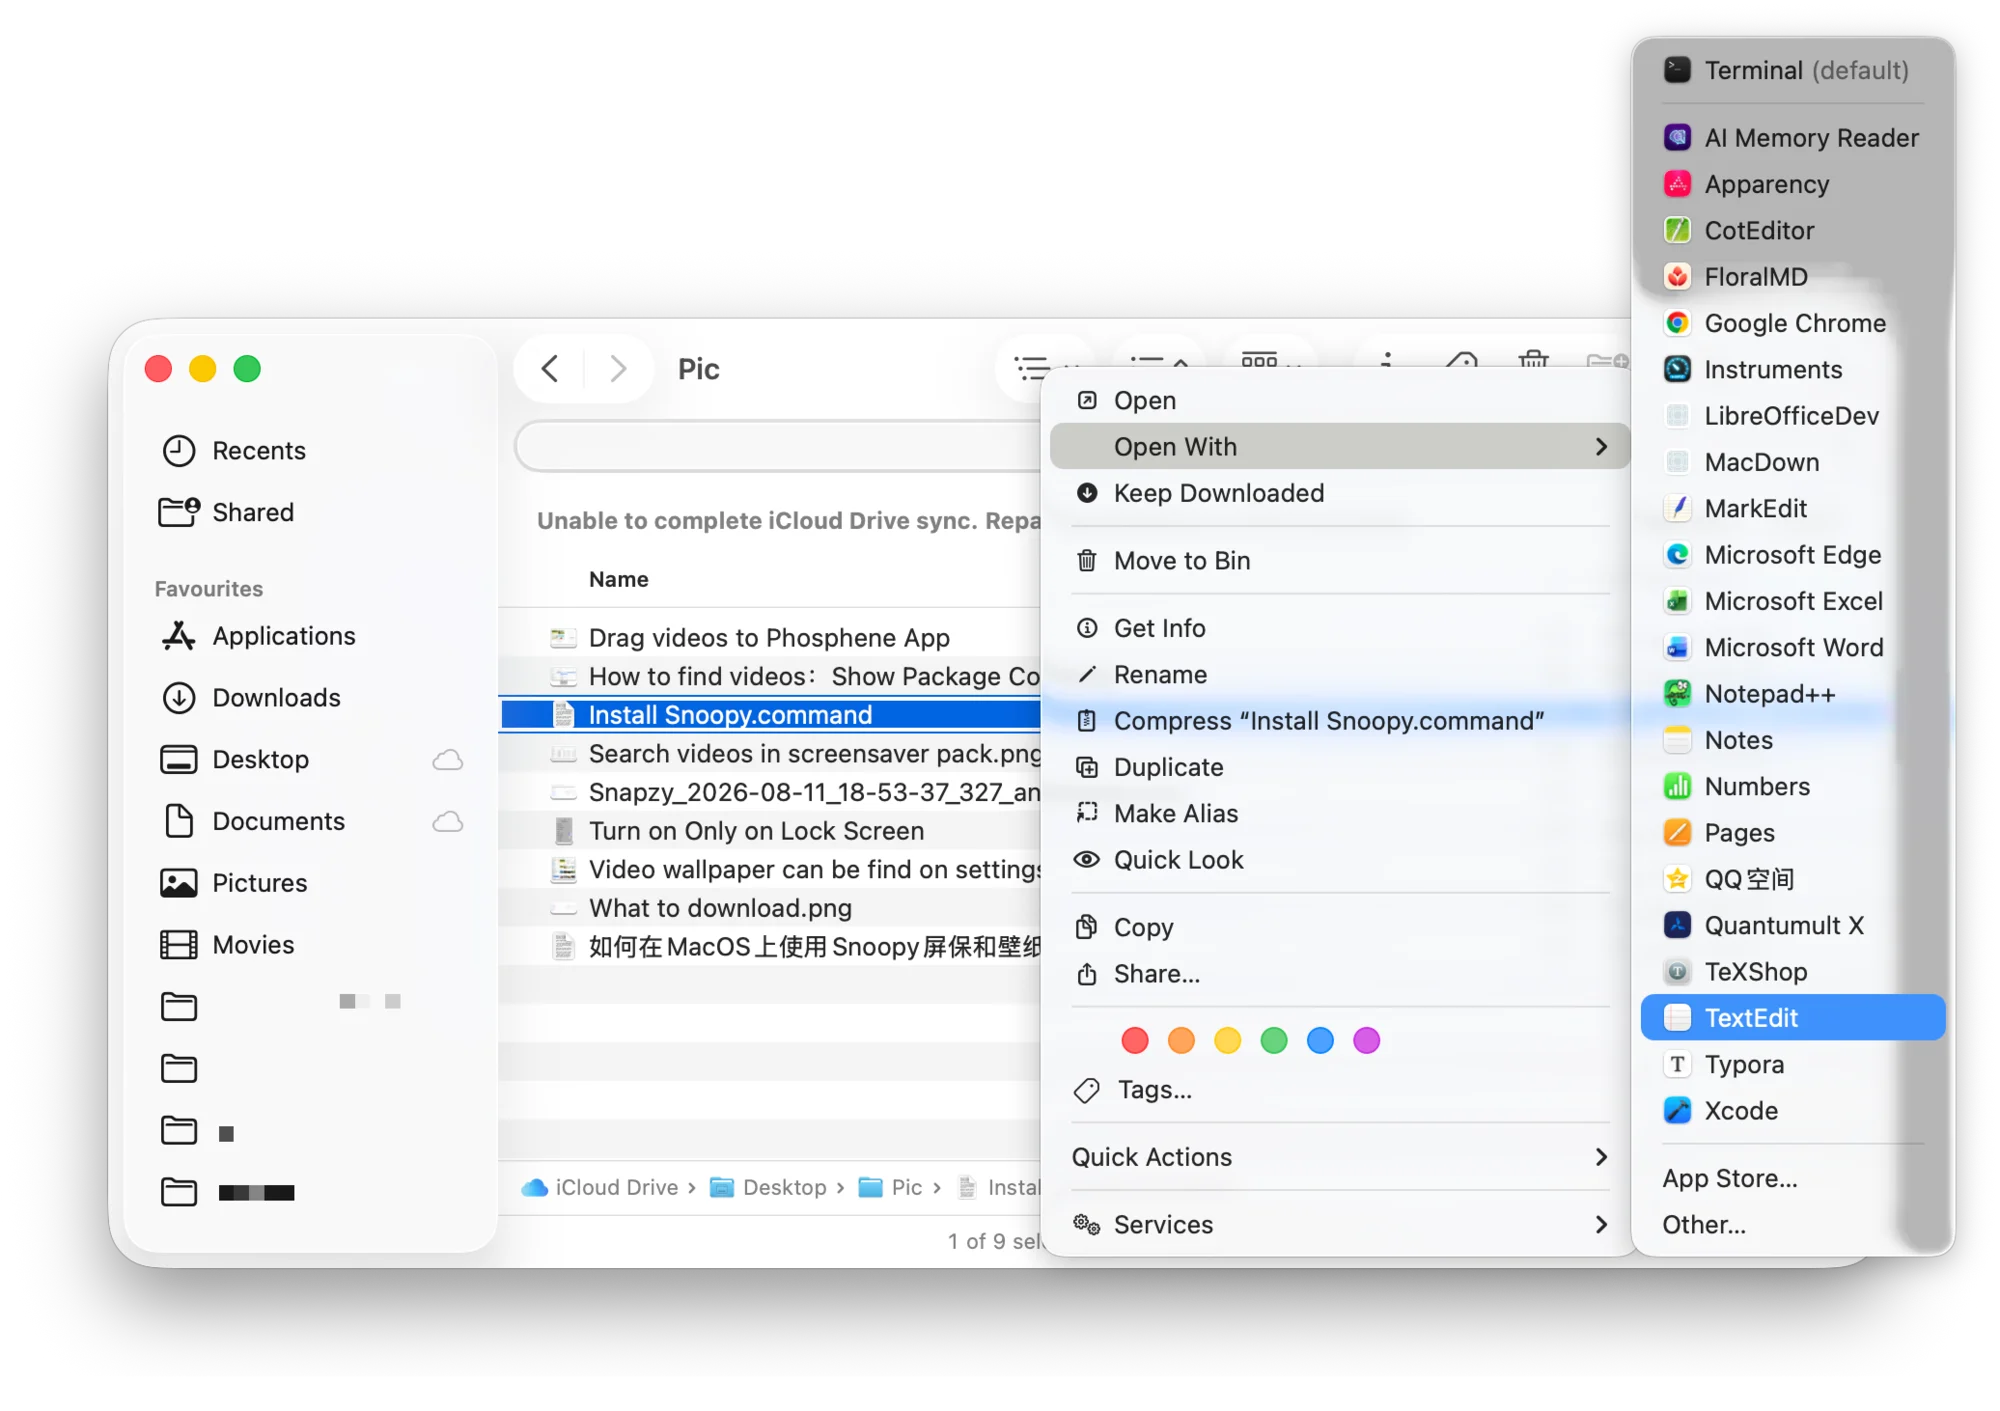
Extract Install-Snoopy-1.1.zip and place the resulting Install Snoopy.command file in the same folder as all four DMG parts. The original release script reconstructs and verifies the disk image, then installs the screen saver. Because we only need the media files, do not run the original script yet. Instead, right-click Install Snoopy.command in Finder and choose Open With → TextEdit (see Figure 2).
Press ⌘ Command + A to select the entire file, delete its contents, and replace them with this script:
|
|
This version keeps the release’s part checks and SHA-256 verification, but removes the step that installs the screen saver. It only combines the four downloaded parts into a complete DMG.
Save the file and double-click Install Snoopy.command. When it finishes, the script creates Snoopy-1.1.dmg in the same folder and reveals it in Finder. If macOS blocks the command, first confirm that every file came from the project release above, then right-click the command and choose Open. If necessary, go to System Settings → Privacy & Security and choose Open Anyway.
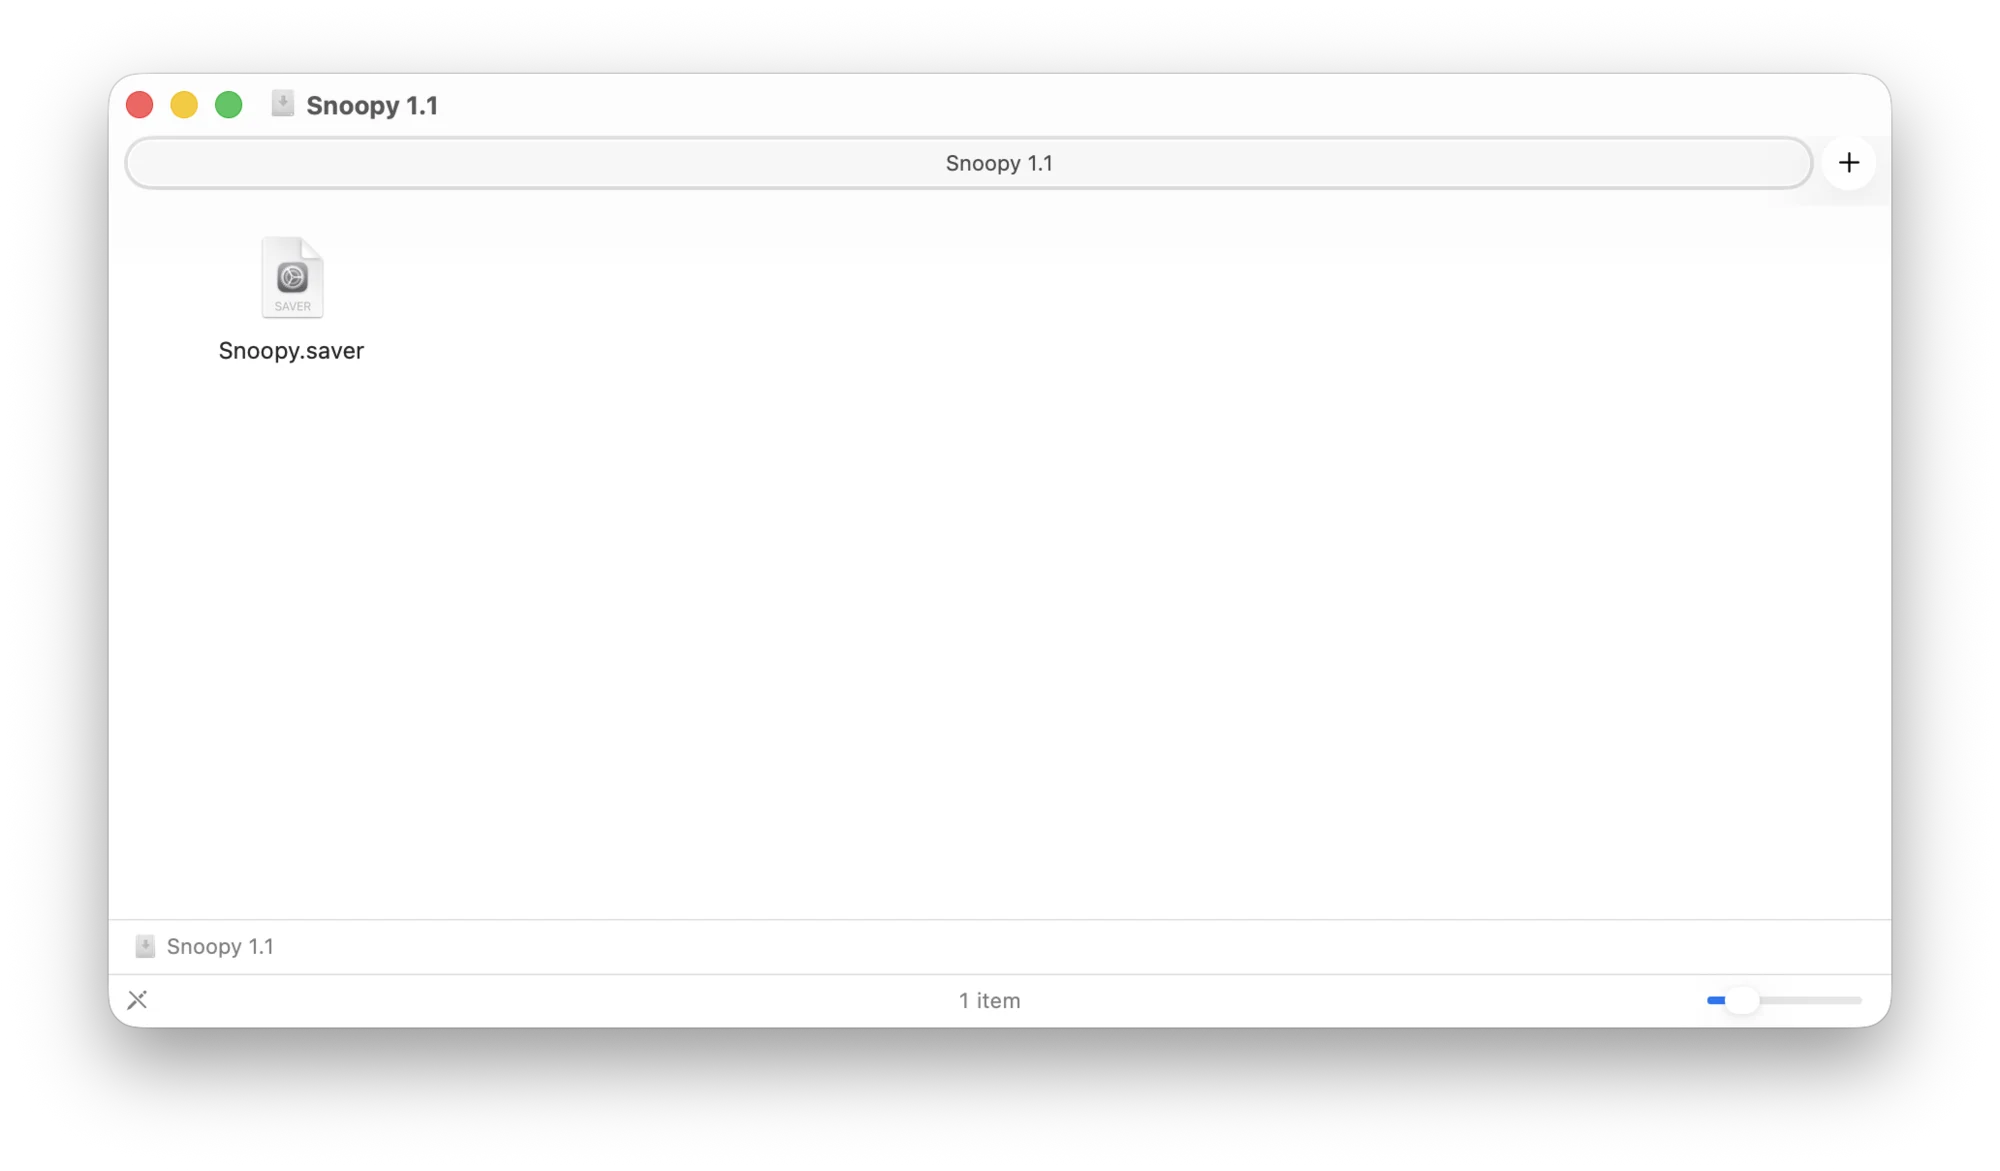
Open the reconstructed DMG. It contains Snoopy.saver. Drag this bundle to a normal writable folder, such as the folder containing your downloads. Searching directly inside the read-only disk image is less convenient (see Figure 3).
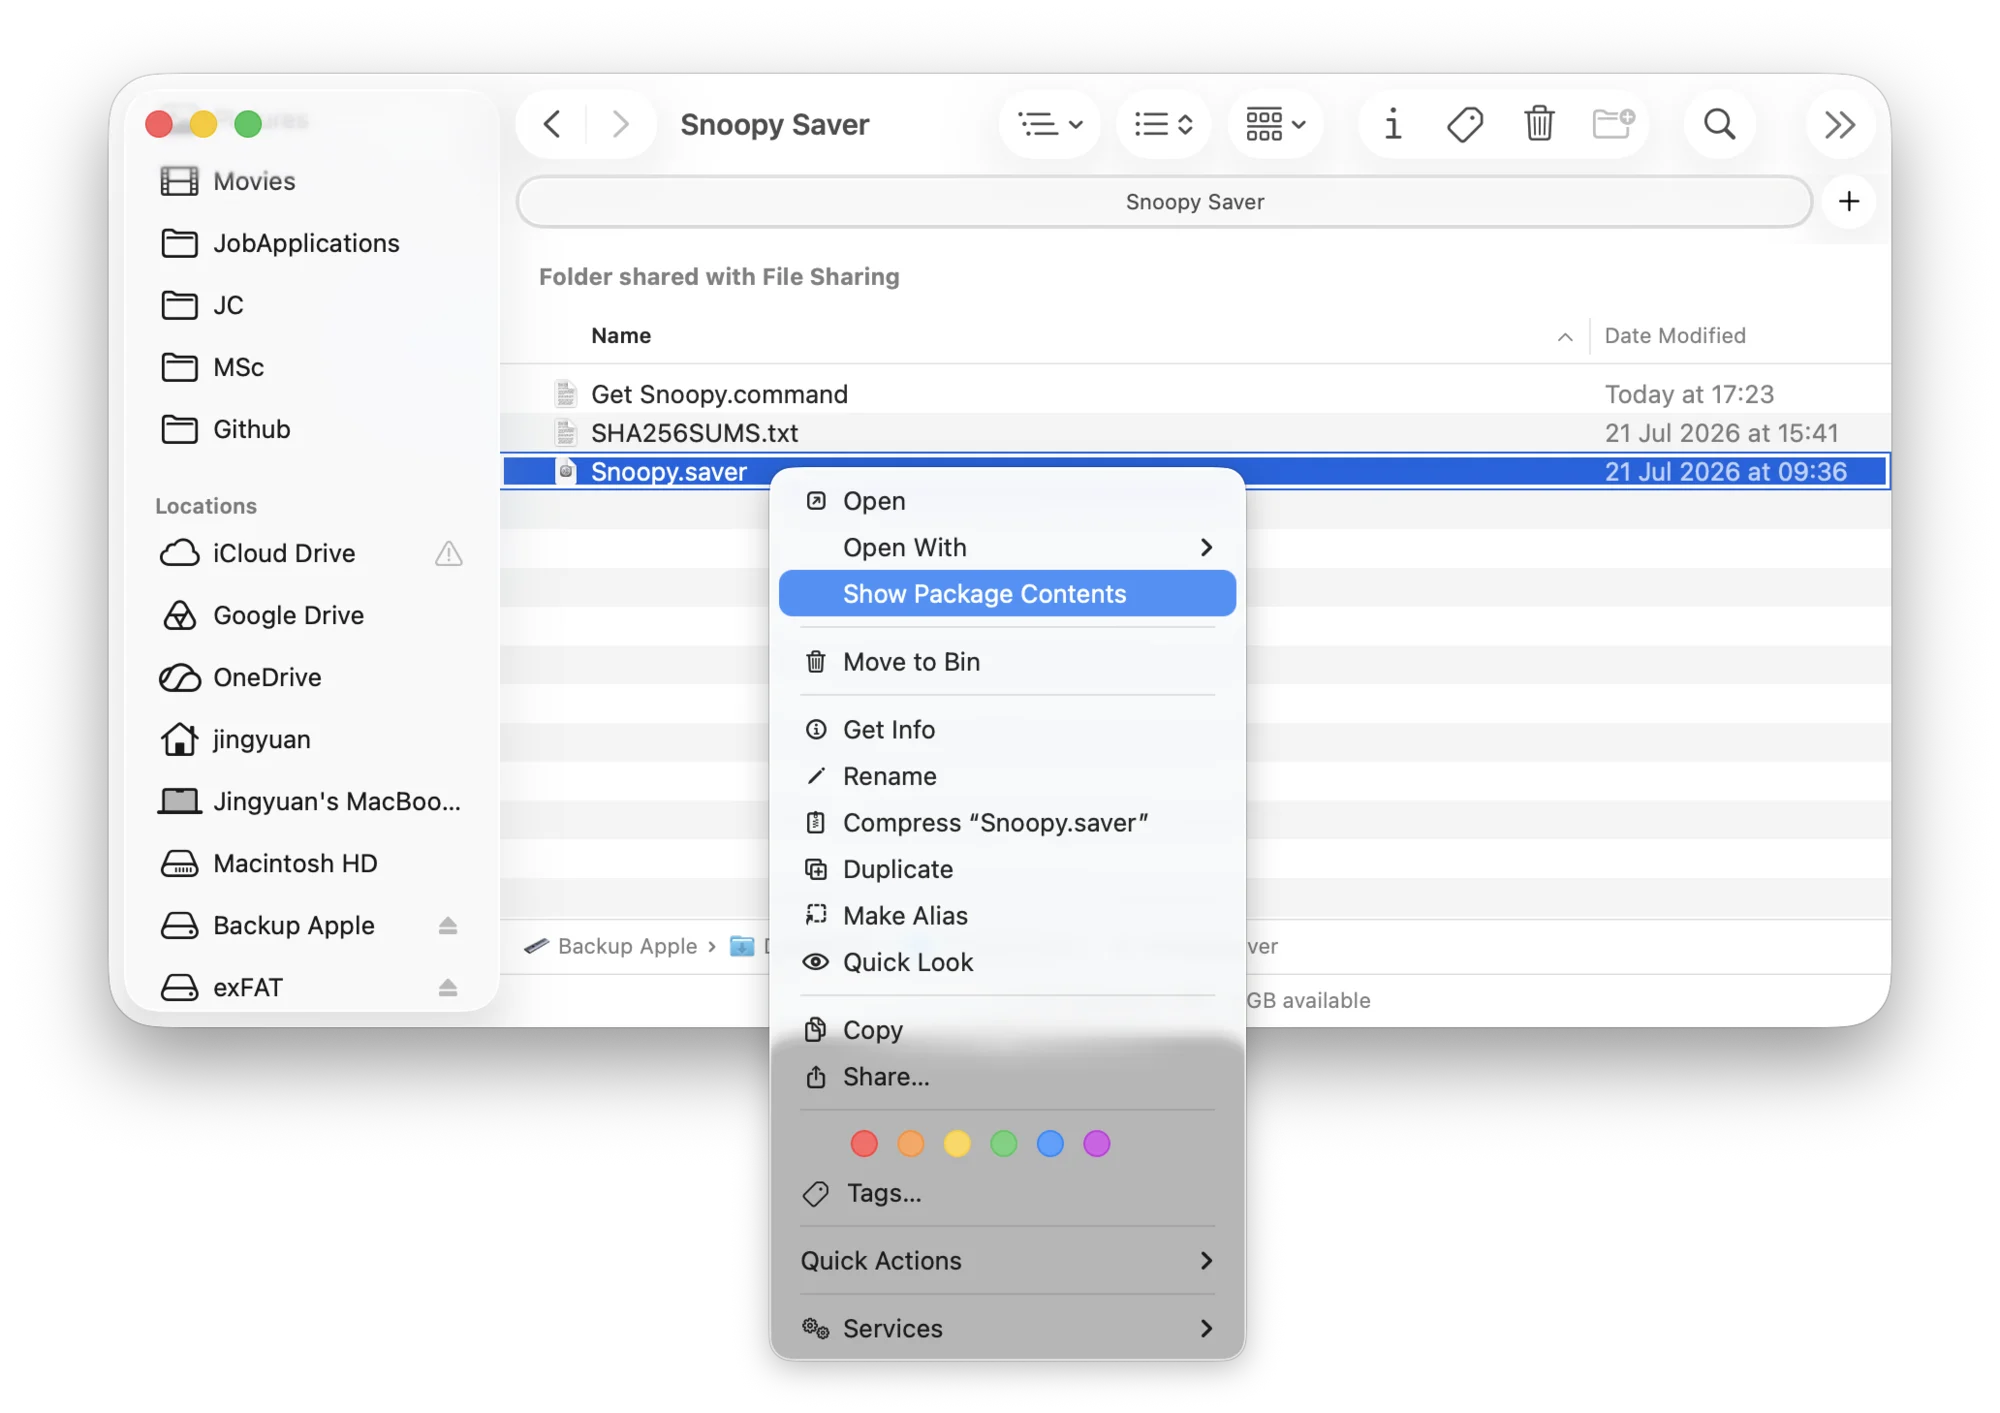
Right-click the copied Snoopy.saver. Do not double-click it and do not choose the first Open command. Select Show Package Contents instead (see Figure 4).
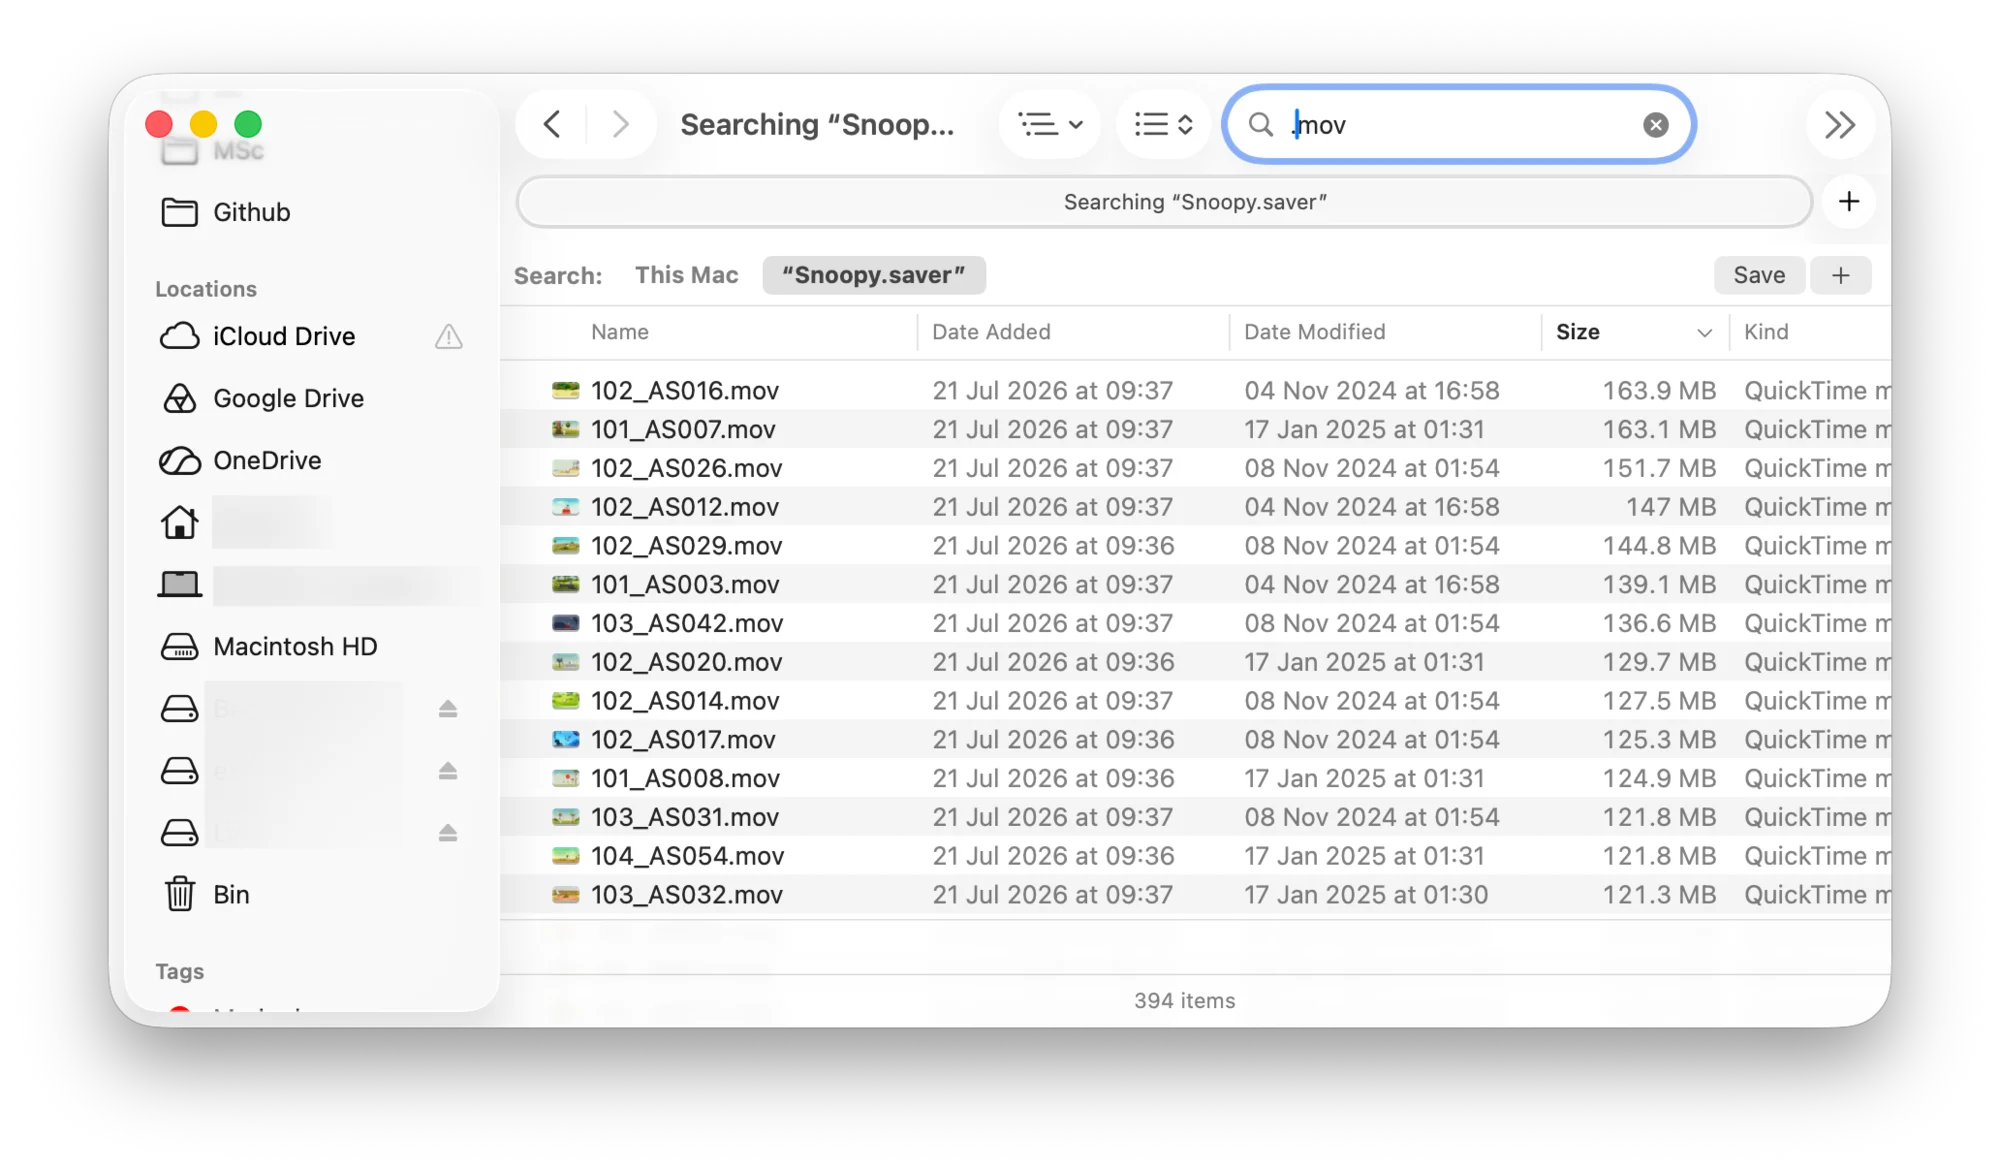
You do not need to work through the bundle’s nested directories manually. Search for .mov in Finder and keep the search scope set to Snoopy.saver. Sort the results by size to surface the full wallpaper scenes quickly. The bundle also contains very short transitions and image resources, while the larger MOV files are more likely to be complete scenes (see Figure 5).
Install the video wallpaper
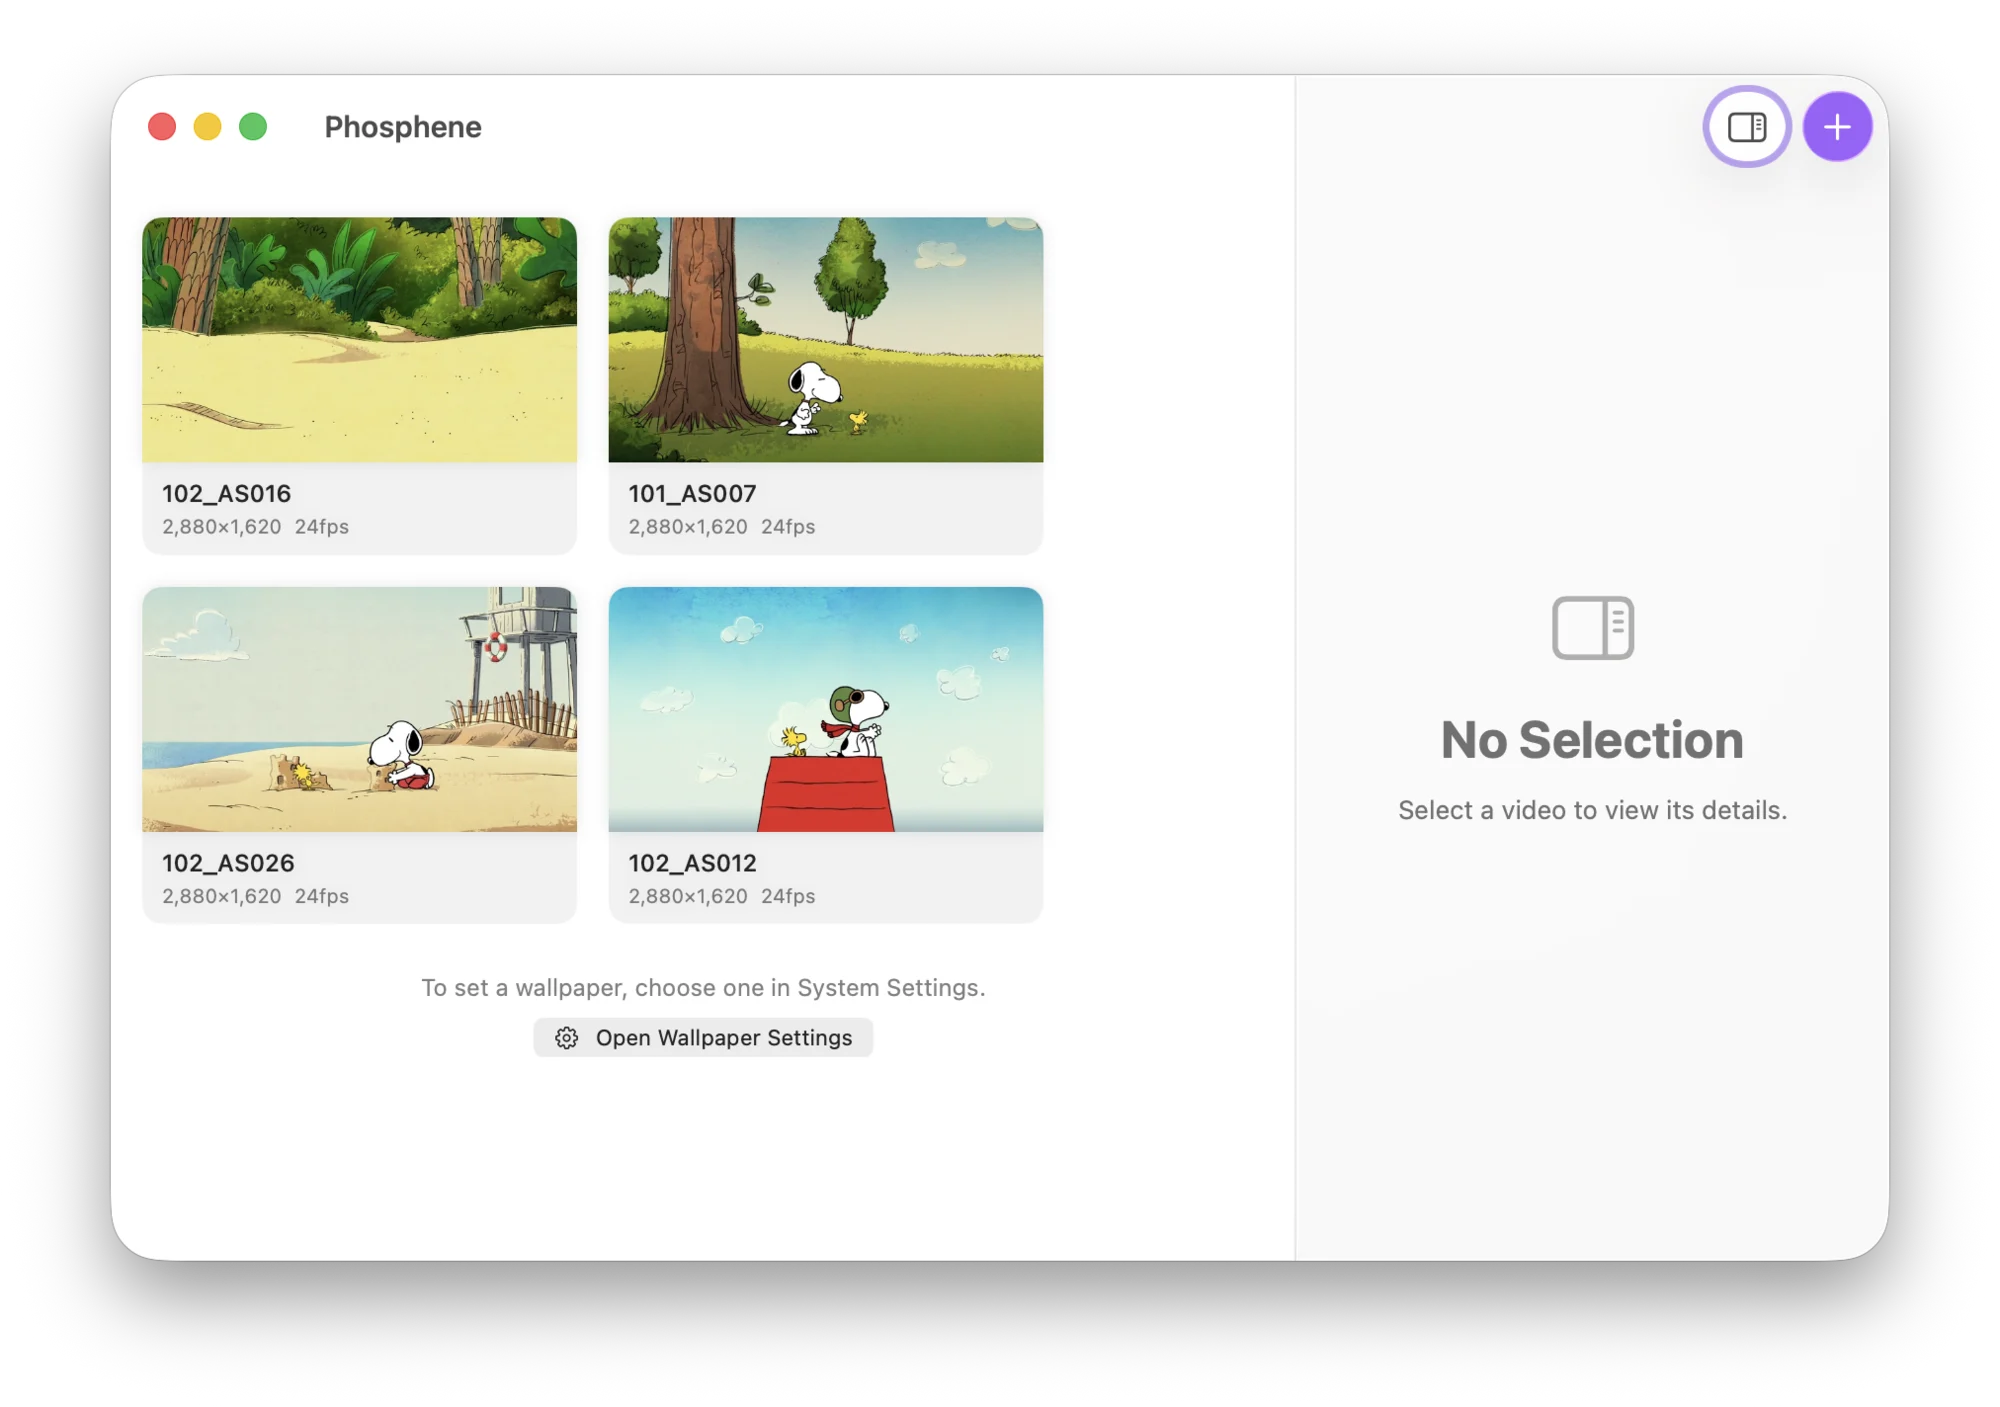
Open Phosphene and drag one or more Snoopy videos into its main window. You can also click the + button at the top-right and select the files manually.
Snoopy is optional. Phosphene can import any compatible video you have recorded or downloaded.
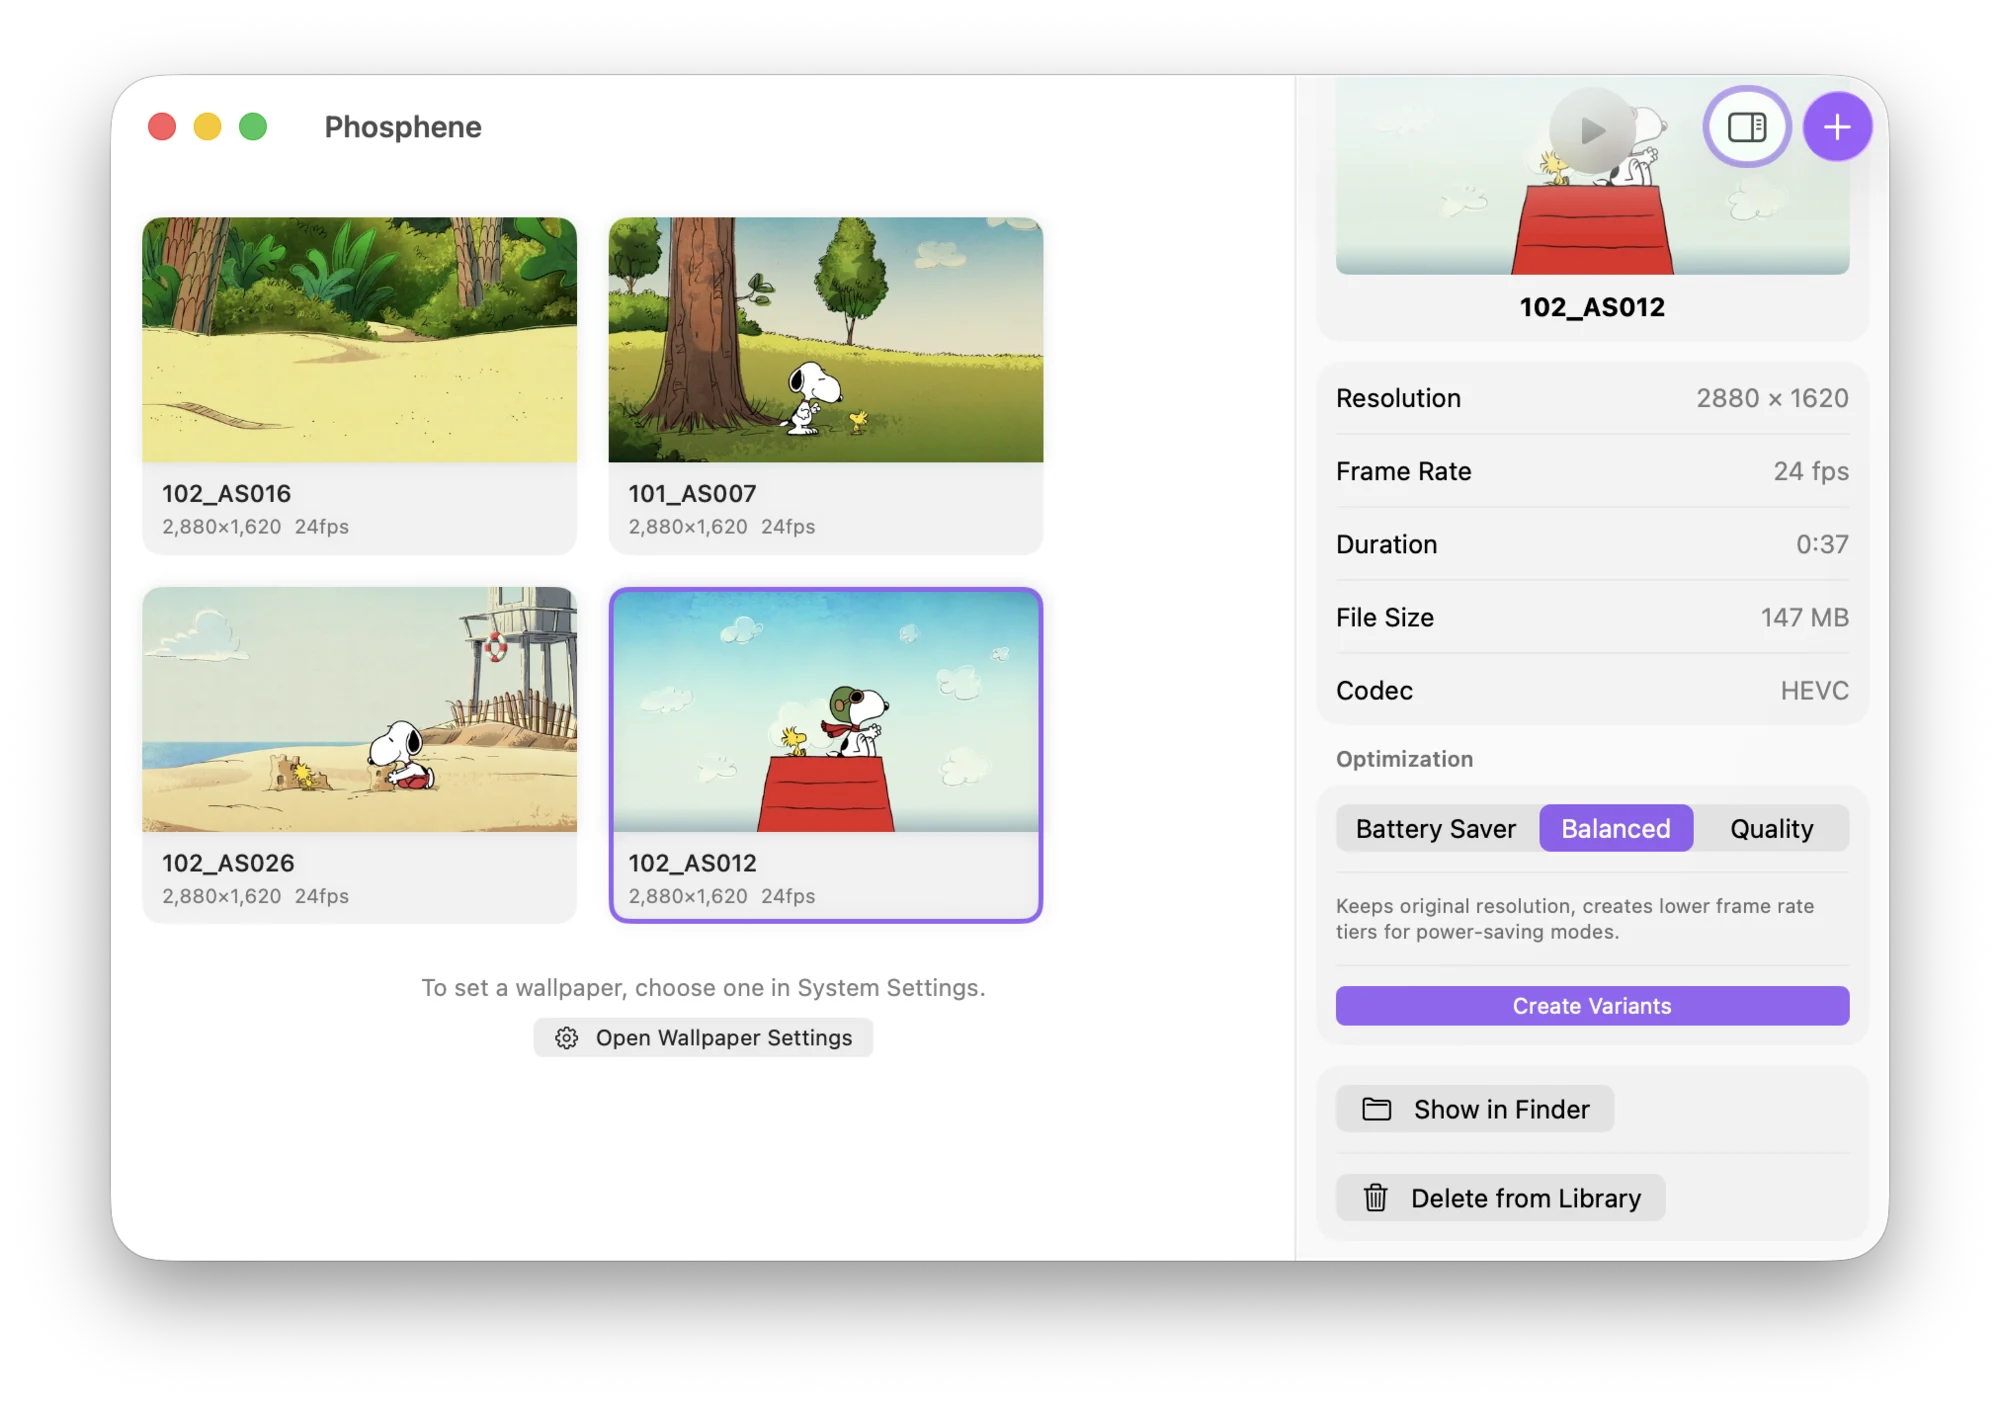
Select a video to see its resolution, frame rate, duration, file size, and codec. Under Optimization, Phosphene offers Battery Saver, Balanced, and Quality. After choosing a profile, Create Variants prepares versions suitable for different power conditions.
I recommend starting with the default Balanced profile. Choose Quality if image fidelity matters more than storage and power use, or Battery Saver when runtime is the priority.
The source video still matters most. A MacBook’s high-density display benefits from a sharp, stable, landscape-format clip. Raising the optimization setting cannot restore detail that is absent from a low-resolution original.
If you need 4K footage, these libraries are useful starting points:
- Pexels Videos for nature, city, and lifestyle footage.
- Pixabay 4K Videos for a browsable 4K collection.
- Mixkit Stock Video for 4K and HD clips with the applicable licence shown for each item.
- MediaStorm Material Library for another collection of high-resolution footage.
Licensing varies between sites and individual clips. Check the licence on the specific download page, especially before redistributing a clip, using it commercially, or using media that contains a third-party character.
Once the import finishes, macOS registers the video wallpaper. Open System Settings → Wallpaper and find the Phosphene — Video Wallpapers collection alongside Apple’s built-in choices. Select a video just as you would select a system wallpaper (see Figure 8).
Phosphene is the library and settings interface. After selecting a wallpaper, you can quit the app with ⌘ Command + Q; the macOS wallpaper process and Phosphene extension continue to handle playback.
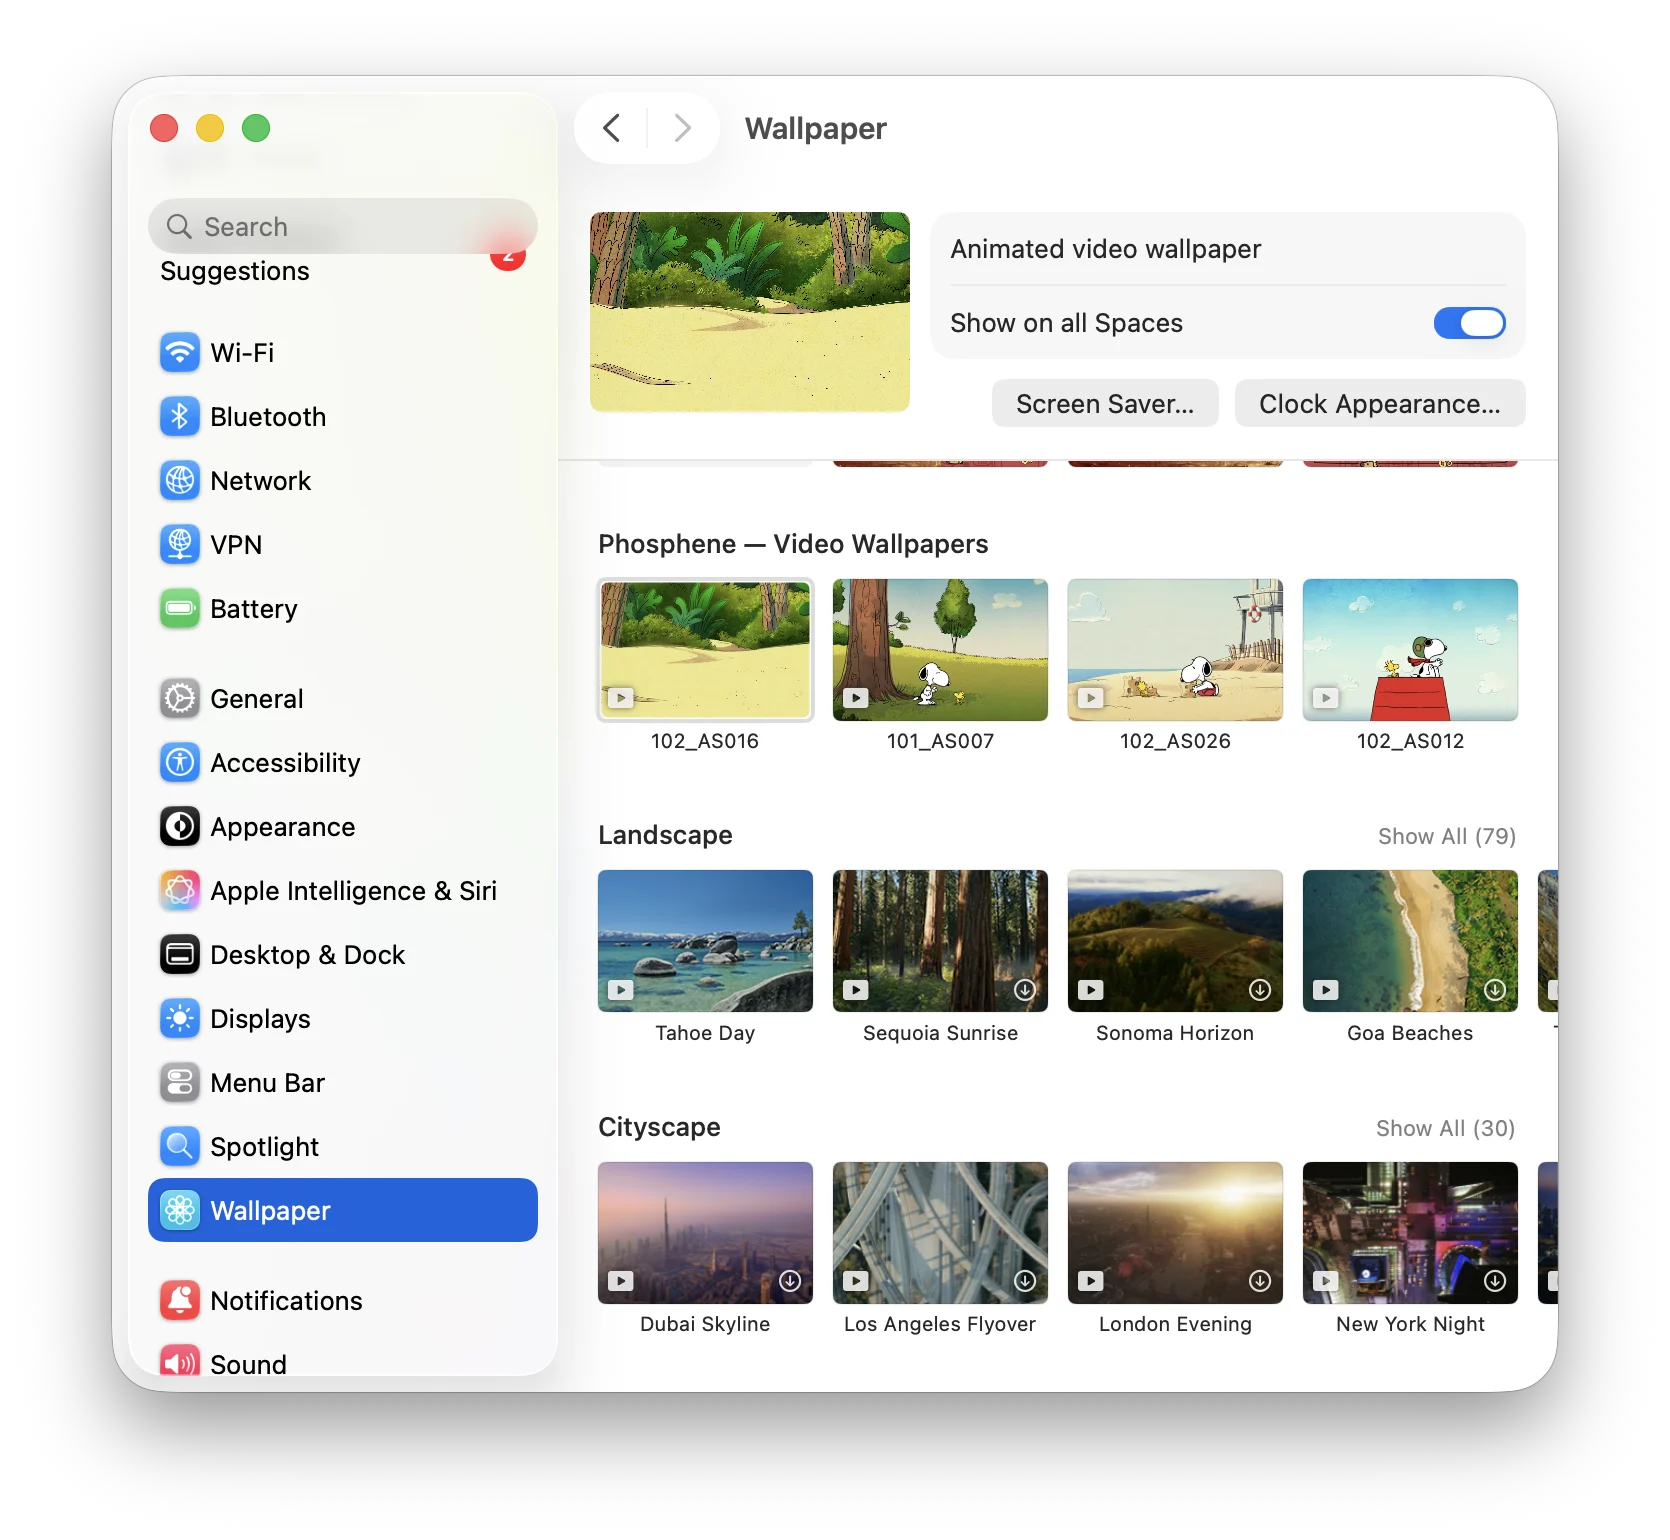
To remove a video later, select it in Phosphene and use Delete from Library. You can also choose Show in Finder to inspect its stored file before removing it manually.
By default, the video continues playing on both the desktop and the Lock Screen:
For the Apple Aerial-style behaviour—motion on the Lock Screen, a still desktop, and a smooth transition back to the still frame when you unlock—click the Phosphene menu bar icon, expand Options, and enable Only on Lock Screen (see Figure 9).
Summary
The important difference is that this method does not simply place a looping video window behind the desktop. It adds the video to the macOS wallpaper pipeline. The wallpaper appears in System Settings, macOS coordinates desktop, Lock Screen, sleep, and unlock transitions, and the Phosphene management app does not need to remain open.
If you already have a suitable video, the workflow is short: install Phosphene, import the file, and select it in Wallpaper settings. The Snoopy extraction is entirely optional. Enable Only on Lock Screen for the closest match to Apple’s Aerial behaviour, or leave it disabled when you want continuous desktop animation.
The main limitation is that Phosphene depends on an undocumented framework and the current release requires macOS Tahoe 26 or later. On a supported system, it is the closest implementation I have found to a native custom macOS video wallpaper.
Frequently asked questions
Which Macs does Phosphene support?
At the time of writing, Phosphene 1.2.2 requires macOS Tahoe 26 or later. Its release is universal and supports both Apple silicon and Intel Macs. Because the app relies on a private framework, check its README or Releases after a major macOS upgrade.
Do I have to download Snoopy-Saver?
No. Snoopy-Saver is only used to obtain the Apple TV Snoopy video files. If you want to use your own video, install Phosphene and go directly to Install the video wallpaper.
Why does the wallpaper keep playing after I quit Phosphene?
The main app manages the library and settings. The wallpaper extension runs inside the macOS WallpaperAgent process and supplies the actual frames, so quitting the management app does not stop the selected wallpaper.
What should I do if the wallpaper is grey, frozen, or showing the wrong video?
Open the Phosphene menu bar menu and choose Restart Wallpaper Agent. The project documentation notes that switching video wallpapers very quickly can occasionally leave the macOS wallpaper process out of sync. Restarting that agent usually restores playback without restarting the whole Mac.
How can I reduce power consumption?
Enable Only on Lock Screen so the desktop remains still, enable Pause When Hidden, or create Balanced or Battery Saver variants. Source resolution, frame rate, and codec complexity also affect power use.
Why modify the Snoopy-Saver installer script?
The original script reconstructs and verifies the DMG, then installs Snoopy.saver in the user’s screen saver directory. This guide only needs the media files. The replacement script stops after reconstruction and SHA-256 verification, and it does not alter the four downloaded parts.
Can I redistribute or commercially use the Snoopy videos?
Do not assume so. Snoopy, the Apple TV media, and related assets have their own rights holders. Snoopy-Saver also states that it is not affiliated with Peanuts Worldwide LLC, Peanuts, or Apple Inc. This extraction method is best treated as a personal learning and private-use workflow. Follow the applicable licence for any other footage you import.
References
- Phosphene project and documentation
- Phosphene 1.2.2 release
- Snoopy-Saver: Snoopy 1.1 release and split-DMG instructions
- hitnology/snoopy macOS screen saver port
- Reddit: The absolute easiest way to get the Snoopy screen saver on macOS
- Reddit: Snoopy custom screensaver (with download link)
- Reddit: Apple TV Snoopy Screen Saver now can use on macOS
- YouTube: macOS Snoopy screen saver demonstration
Disclaimer
This article is an independently written, unofficial technical guide intended only for learning and discussion. It is not affiliated with, authorized by, endorsed by, or produced in cooperation with Peanuts Worldwide LLC, Apple Inc., or any of their affiliated companies.
The rights to Snoopy, Peanuts, and related characters, names, and materials belong to their respective rights holders. Apple, Apple TV, tvOS, macOS, and related trademarks and materials belong to Apple Inc. This site neither provides nor hosts the original Apple TV Snoopy video files and does not grant any right to copy, redistribute, or commercially use the related materials. Please use these resources only for personal learning and non-commercial purposes where you have lawful access to them.